How to Tie Dye Shirts? Easy Guideline For Beginners

Are you looking for simple and easy ways to tie-dye your shirts using your regular supplies? We can help because we have prepared a quick and easy tutorial for you to tie-dye your shirts at home.
Although you can get a tie-dying kit available in almost all online shops or even the physical ones, they might cost you a lot. So, better learn how to tie-dye shirts using the kinds of stuff lying at your home with some easy tips and tricks.
Let’s get started.
Basic Supplies You Need
Here are the things you will need to tie-dye your shirts:
- Gloves
- Apron
- Tarp or Plastic Cover
- Fabric Dye
- Plastic Squeeze Bottles
- Ziploc or airtight bags
- Big tub or container
- Elastic rubber bands/zip ties
- Jar or mixing container
After you have grabbed the best material to tie dye, you can also use bakers’ racks and tongs in addition to the essential supplies. The racks would prevent the colors from spreading in places where they aren’t wanted. It will also make it easier for the shirt to absorb the colors.
Instead of using your hands to pick up your shirt and distribute colors while flipping it to the other side, you can use the tongs. Zip ties are also far more dependable than rubber bands, especially for inexperienced users. It also produces clean lines and is easy to tie and remove from the clothes compared to rubber bands.
Step-by-Step Instructions on How to Tie Die Shirts

Now that you have everything you need for the process let’s get started.
1. Preparing Your Dye
The first thing you need to do is prepare your dye properly. Otherwise, it won’t set properly in your shirt and wouldn’t give off the best results. It is best to use the powder dyes available in the market.
Take a jar or any mixing container and pour some warm water into it. After that, mix your dye powder in the warm water. You can take any color dye you want according to your choice but do not mix it up in the squeeze bottles directly.
Mix it up separately and then transfer it into the squeeze bottles or spray bottles. You can use either a squeeze bottle or spray bottle as per your wish. But squeeze bottles are better as the color would spread evenly.
However, if you dye your shirt in just one color, you can dip your shirt in a container full of dye if you don’t wanna use the squeeze or spray bottles. The container would need a lot of dye than the bottles.
Step 2: Binding the Shirt with Different Patterns
Nowadays, there are different kinds of patterns available for tie-dyed shirts. Spiral, crumple, bullseye, shibori, etc., are some easy and common patterns. You can also look for hundreds of other available patterns and dye your shirt according to them. Different patterns are made using different techniques.
In this tutorial, we’ll be talking about the crumple pattern. It is the easiest pattern of all and also a good one for beginners to learn. First, place your shirt evenly over the plastic for this pattern and start crumbling it with your fingers.
Keep scrunching until it’s all crumpled properly. Now, tie the shirt with elastic rubber bands – the tighter the rubber bands, the better the patterns.
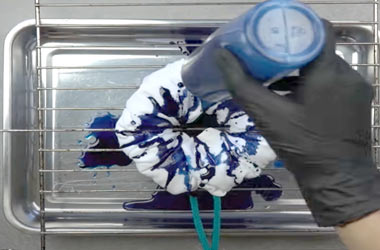
Step 3: Applying Dye to the Shirt
Before applying dye to your shirt, soak your shirt in the water. The looks of the shirt will depend on how wet or dry your shirt is. If you want some sharp lines, you should keep your shirt dry. You can also damp your shirt with a spray bottle of water if you think that the colors might spread too much if the shirt is wet.
So, it is a must to wash your shirt before dying it to remove its stiffness just like in our how to acid wash a shirt article. . Whether you dye it damp or wet, prewashing your shirt is a must. Otherwise, the colors might look terrible.
Now it’s time to add some colors to your shirt. Take your bottle full of dye to start squeezing out the colors in your shirt. The colors are likely to spread because your garments will be moist or damp. As a result, leave some space between each color. It wouldn’t take much; just a little space would suffice.
If you’re using a single color, keep pouring the colors properly to both sides. If you use different colors, apply each color to each section separated by the rubber bands.
Now, flip the shirt and apply the colors matching the colors from the other side. Liberally use the dyes on both sides for vibrant colors to your shirts.
There is no wrong color while tie-dying. But knowing the color wheel would help you make beautiful patterns on your own. Just make sure to match the patterns of colors on both sides of your t-shirt regardless of your shirts weight. After mastering this easy pattern, you can make any other patterns in your shirt.
Step 4: Leaving the Dye to Set
After applying the dye to your shirt, you need to leave it for a while to dry. Take a big ziplock bag that fits your shirt. Carefully keep the shirt inside the bag. Any sealable or airtight bags will do.
This lets the shirt absorb the dye properly. You need to keep the shirt like this for 6-8 hours for the color to set properly. The shirts can be kept damp overnight if you are skeptical if you think your dye might need some more time to set.
Step 5: Rinsing out the Dye
Once your dye is set, open the ziplock and take out your shirt. Carefully remove the rubber bands and have a look at the amazing pattern. Be very careful while cutting the rubber bands or zip ties to avoid snipping your fabrics.
Now take a container and fill it up with cold water. Gently soak the shirt into the cold water and rinse it. Make sure to rinse it properly so that all residual dye washes off the shirt.
While rinsing it, do not rinse it too harshly; this might affect the fabric. You can also use a fixative instead of cold water. Fixatives are better than cold water but cost a bit more, of course.
Step 6: Washing the Shirt
Now that you have rinsed out all the residual dye wash the shirt properly. For the first wash, it’s always better to avoid the washing machine as it may spread the dye. So, it is better to wash them with your hands the first time after applying dye.
Take a container full of cold water. You can put a small amount of detergent. Please do not go overboard with your detergent, as it might also spread your dye. After washing the shirt with cold water, rinse it in hot water to remove any excess dye.
You can immediately wash it in a washing machine separately to remove any excess dye for extra care. Now that you’ve washed your shirt, it’s time to air dry the shirt and see the results.
And here is a good post if you want to tie-dye polyester properly by yourself.
Final Words
If you want to learn the art of tie-dying, there is no alternative other than practicing it again and again.
Tie-dyeing is not rocket science. You need to have the right equipment and good techniques to do it. Now that you’ve learned how to tie-dye shirts at home, it’s time to make some really cool DIY tie-dyed shirts.
Up Next: Get a good quality knitting row counter – Reviewed by an expert.