Best Iron For Perler Beads Reviews in 2024 | Top 8 Picks
Little drops of water can make the mighty ocean.
And just like those tiny droplets, Perler beads almost have the same function. They look super tiny but have this incredible power to form the most beautiful 3D artwork.

However, you will need a couple of mediums to make it work. First is your passion, then your vision, then effort, and lastly, a compatible iron to take crafting Perler beads to the next level.
Irons plays a giant role when it comes to crafting, especially crafting Perler beads. You want to make sure it has an ideal temperature, stick-free soleplate on parchment paper, and a consistent heat source. Any random iron would be a big no-no for Perler beads!
So, to get the ideal result, you must buy the best iron for Perler beads and make sure the right materials are used for the project: Perler beads, a peg board, and parchment paper.
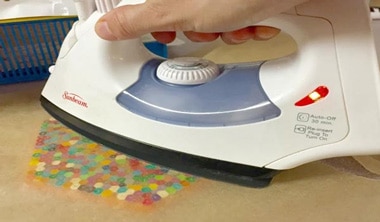
[wptb id=64354]How To Iron Perler Beads?
Step 1
Set the Perler beads design on the peg board. After that, place the peg board on a plain, heat-resistant surface.
Step 2
Cover the Perler beads with parchment paper.
Step 3
Set the iron temperature to medium and wait for it to heat up.
Step 4
As it gets hot, press the iron on the paper and move it in a smooth circular motion for 30 seconds. Make sure to not press it for too long. Lift the iron every 2-3 seconds.
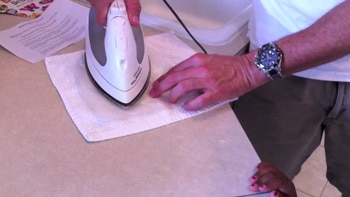
Step 5
Keep ironing the Perler beads until they melt and fuse beads together. After it achieves the right form, give it 5 to 10 minutes to cool.
Step 6
Now, peel that paper off the craft and remove it from the peg board.
Top 8 Iron For Perler Beads Reviews
1. Steamfast SF-717
[easyazon_image align=”center” cart=”n” cloak=”n” height=”500″ identifier=”B001DTHPEQ” locale=”US” nw=”y” nf=”y” src=”https://m.media-amazon.com/images/I/51ZAJ89GPcL.SL500.jpg” tag=”busymomshelpe-20″ width=”350″]
As the name suggests, Steamfast SF-717 is one of the fastest irons you can get for yourself. Give it around 15 seconds, the iron will be ready to flatten your Perler beads. Its soleplate is nonstick so it won’t stick to the parchment paper.
It has three temperature settings with a range from 140°F to 428°F. For Perler beads, we suggest you start with medium heat. Just make sure you don’t use the steam function as it can damage the Perler beads and your project.
A great feature of this iron is the dual voltage system. It can travel with you, is easy to use, and super compact.
This Perler beads iron is very light to hold with a anti-slip handle. Weighing only 1 pound, you won’t feel any pressure in your hands while melting the Perler beads. And the 7.5 ft cord allows you to use this anywhere.
A tiny problem with the iron is that the handle area can get slightly warm. It’s not a major issue, but you may become uncomfortable with extended use.
Highlighted Features:
- Takes 15 seconds to heat up.
- Reaches up to 428°F temperature for ideal melting.
- 3 settings for temperature to adjust accordingly.
- Dual voltage system for travelers.
- 7.5-foot cord is long enough to move with the iron easily.
2. Sunbeam Hot-2-Trot
[easyazon_image align=”center” cart=”n” cloak=”n” height=”500″ identifier=”B0057UMYAW” locale=”US” nw=”y” nf=”y” src=”https://m.media-amazon.com/images/I/41ohXQVRD2L.SL500.jpg” tag=”busymomshelpe-20″ width=”350″]
Maneuvering the Hot-2-Trot on Perler beads is easy thanks to its variable temperature controls. Temperature changes are easy to make during your craft project. Typically, the temp may range from 212°F to 392°F but try to keep the setting at medium.
Heating time is quick at around a minute and a half. By the time you do a final touchup on your Perler beads craft, it’s ready to go.
You can take it anywhere you want since it’s a dual-voltage model. Be it a 100V or 240V outlet, this Perler beads iron works smoothly.
The soleplate has a Teflon coating that is solid and hassle-free. It promises to keep the plate from sticking to the parchment paper, so that you can easily iron on the beads.
It’s quite light at just 1 pound and can be used if you have lots of crafts to make with the Perler beads.
Although the iron is easy to use, the design isn’t suitable for everyone. A thick grip may not be comfortable if you have small hands. If this is you, consider checking out irons like BLACK+DECKER Classic which I also think are compatible with the best iron on transfer paper.
Highlighted Features:
- Teflon plate ensures long-lasting stick resistance and durability.
- Temperature changes quickly within 212°F and 392°F range.
- Takes 1 minute 30 seconds to heat up.
- Dual voltage for using it anywhere around the world.
- Thick handle is ideal for people with large hands.
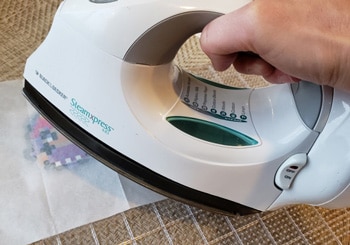
3. Sunbeam Steammaster Steam Iron
[easyazon_image align=”center” cart=”n” cloak=”n” height=”428″ identifier=”B01AX6RCD8″ locale=”US” nw=”y” nf=”y” src=”https://m.media-amazon.com/images/I/41w0ASm1CcS._SL500_.jpg” tag=”busymomshelpe-20″ width=”350″]
This Steammaster knows how to be smart yet efficient with its unique features. Steammaster is another model by Sunbeam that comes with a self-cleaning button. This feature uses water to help flush out the minerals that can affect performance.
The stainless steel soleplate is very durable, especially due to that anti-calc system resulting in smooth Perler bead fusing.
Steammaster may not be very quick to heat but it won’t be slow either. As you turn it on and adjust the temperature, it will get ready within 2 minutes to iron your Perler beads. The iron fuses them together so well that you’ll love making small gifts for others.
One of the most convenient features is its retractable cord that retracts quickly as you press the button. The cord extends up to 8 feet which is longer even than the rival SF-717.
Its auto shut-off feature is useful. If you forget to turn it off after you’re done with the Perler beads fusion, the iron will do that for you.
The only major issue with the iron is the steam has three different levels, but they work pretty much the same. You probably won’t be using more than one setting for making Perler beads crafts but you should know the little flaw.
Highlighted Features:
- Self-cleaning system helps prevent mineral/calcium buildup.
- Retractable cord retracts fast and extends up to 8 feet long.
- Takes 2 minutes to heat up.
- Durable stainless steel soleplate irons smoothly.
- Comes with auto shut-off feature.
4. Mueller Professional Grade MU-77XB
[easyazon_image align=”center” cart=”n” cloak=”n” height=”493″ identifier=”B082XJTJBS” locale=”US” nw=”y” nf=”y” src=”https://m.media-amazon.com/images/I/51wCb1eIauL._SL500_.jpg” tag=”busymomshelpe-20″ width=”350″]
Grade MU-77XB by Mueller is quite similar to Steammaster but faster. You’ll be fusing beads in no time due to it only taking 30 seconds to heat. The flat soleplate is super nonstick and won’t stick to the parchment paper.
Heat levels are adjustable with an easy-to-use dial. Setting it to medium will be great for Perler bead art. Adjust the heat level accordingly if the Perler beads aren’t melting quickly enough.
An auto shut-off feature provides additional safety. If it stays vertically inactive, it will turn off after 30 seconds. When placed horizontally, it will take 8 minutes.
It has a self-cleaning system that keeps the plate from mineral and calcium buildups. Use it every 20 days and let the system shoo away all the scale deposits. This will help a lot in optimizing the efficiency of the iron and extend its useful life.
This is the best iron for Perler beads. The 8-feet cord is long but retractable which makes it very convenient to use. Not only can you work freely with the iron but also keep it tangle-free.
At 3.5 lbs. you may find it heavy. But this is beneficial as it helps fuse the Perler beads together while using a circular motion as you iron them. However, if you have arthritis issue, then we suggest that you consider the Steammaster instead.
Highlighted Features:
- Heats up within 30 seconds depending on the heat level.
- Self-cleaning system removes calcium buildup.
- Comes with an auto shut-off function.
- 8-feet retractable cord eliminates tangle issue.
- Stainless steel soleplate is durable and nonstick.
5. BLACK+DECKER Classic Steam Iron
[easyazon_image align=”center” cart=”n” cloak=”n” height=”500″ identifier=”B001RJTQ8U” locale=”US” nw=”y” nf=”y” src=”https://m.media-amazon.com/images/I/51TseHCAWnL._SL500_.jpg” tag=”busymomshelpe-20″ width=”350″]
Want a heavy-duty iron for Perler beads project? Then check out this Classic iron by Black+Decker. Its aluminum soleplate doesn’t have any nonstick coating but it promises to be hassle-free. You will love how smoothly it flattens the Perler beads without sticking to the parchment paper.
Because the iron is 3.2 lbs., it is be heavy enough to help the beads stick to each other. It’s a pro but if you have a big project and don’t want the extra weight, you can check out other lightweight models like Dyno Merchandise D25006.
This Perler beads iron comes with 7 temperature settings that range from 217°F to 374°F. We recommend you start by setting the level to 6 for melting the beads. You will get both steady and efficient results as you lift up the iron.
The Classic features an auto shut-off system that provides a level of safety. It will turn off on its own if you leave it inactive for 30 seconds on soleplate or 8 minutes on heel rest.
As for the heating time, the iron is fairly quick. The lowest level will take 3 minutes while the highest level takes about 5 minutes.
Highlighted Features:
- Heavy-duty iron with long-lasting aluminum soleplate.
- 7 temperature settings ranging from 217°F to 374°F.
- Comes with auto shut-off feature.
- Takes 3 minutes to heat up.
- Delivers steady weight and temperature.
6. Conair EZ Press
[easyazon_image align=”center” cart=”n” cloak=”n” height=”335″ identifier=”B0015QXFQ4″ locale=”US” nw=”y” nf=”y” src=”https://m.media-amazon.com/images/I/41eJbo5JwuL._SL500_.jpg” tag=”busymomshelpe-20″ width=”350″]
Heating up right in 35 seconds, the easy-to-use Conair EZ Press will keep pace with serious crafters.
It looks compact but does mighty work such as making Perler beads art! The heat it delivers is steady and this helps melt those little pieces evenly.
Coming in just 1 pound, it’s very light to hold. You can carry it anywhere you want since it’s compatible with 110-120V and 220-240V. The handle design is perfect for the ones who have smaller hands. No matter how many crafts you want to make with beads, the iron will be comfy to work with.
The dial below the handle is used to adjust the heat. if you’re new to such design, it might be awkward at first, but you will get used to it. A positive feature is that the dial is easy to turn.
The iron may not get as much hot as others. However, the max or close to max setting will work just fine for melting the Perler beads and making crafts.
Its stainless steel soleplate promises to be durable for many years. It may not be coated with nonstick layer but it won’t cause any sticking issue. Using parchment paper also reduces the chance of the iron sticking to the beads.
Highlighted Features:
- 35 second heating time.
- 1 pound makes it easy to hold.
- Temperature adjusts with ease.
- Durable and easy-to-glide stainless steel soleplate.
- Features dual voltage system.
7. Dyno Merchandise D25006
[easyazon_image align=”center” cart=”n” cloak=”n” height=”500″ identifier=”B000W5JPNG” locale=”US” nw=”y” nf=”y” src=”https://m.media-amazon.com/images/I/61MU+rrcZCL._SL500_.jpg” tag=”busymomshelpe-20″ width=”350″]
D25006 by Dyno Merchandise is a great mini iron for Perler beads. If you want to craft something quick with the kids, then opt for this model. Its basic-single function makes it super easy to use.
The Perler bead mini iron takes around 3 minutes to heat up but you will love its consistency. As you press it over the Perler beads with the paper in between, the soleplate will fuse beads beautifully. Although D25006 runs at single temperature, it’s just right and fast for this type of craft.
I love this mini iron as it weighs only 0.11 lbs. and is super easy to handle. Speaking of which, the handle is tiny but comfortable to hold.
The only drawback is the cord. It’s long but pretty bulky for a small-sized iron. Since the port is on the left side, it may not be as convenient for right-handers as it will be for left-handers.
Highlighted Features:
- Very compact and easily portable.
- Being 0.11 lbs., it’s super light to work with.
- Great for left-handers.
- Takes 3 minutes to heat up.
- Single temperature but consistent.
8. Sharper Image SI-755
[easyazon_image align=”center” cart=”n” cloak=”n” height=”500″ identifier=”B083W5CXZM” locale=”US” nw=”y” nf=”y” src=”https://m.media-amazon.com/images/I/5101iG3JaTL._SL500_.jpg” tag=”busymomshelpe-20″ width=”350″]
This iron tends to provide you with a 3D but sharper image as you press it on Perler beads. SI-755 is indeed compact but the soleplate is big enough to cover a medium-sized artwork.
It heats up super-fast in just a minute. There’s a dial that enables you to adjust the temperature from minimum to maximum to steam. The maximum can reach up to 200°F which works for the beads to melt and fuse.
Coming in 1.45 lbs. this iron is easy to use for serious crafting sessions. Even if you have a lot of Perler beads to craft, you will love working with SI-755 as the handle design is simply amazing by providing both comfort and control while using the iron on the Perler beads.
The cord measures around 7 feet – long enough to give you the flexibility you want. One useful feature is that it has a switch to change from 120V to 240V. So, the iron can accompany you anywhere.
Highlighted Features:
- Heats up in only 1 minute.
- Weighs around 1.45 lbs.
- Switch for changing the voltage setting.
- Compact with a big and even-heating soleplate.
- Dial with 3 temperature settings.
Iron For Perler Beads Comparison Chart
[wptb id=64374]Iron For Perler Beads Buying Guide
Dry or Steam?
It’s only the dry setting because steam will ruin the paper, the beads, your project, and all your hard work. A steam function is a common need for irons, but not for craft projects.
As for which model to choose, it depends on your preferences. This goes for just about any crafting martial. If you’re looking for the best diamond painting kits, find something reliable. If you’re planning to use the iron only for fusing Perler beads, then you can get yourself a simple non-steam, regular iron.
But if it’s for ironing both the craft stuff and clothes, then consider getting a steam iron for added versatility. Just make sure to use the dry mode when working on the crafts.
Temperature Control
Typically iron temperature varies from one model to another. The heat level can start from 110°F and can reach up to over 445°F. Many irons don’t even mention the temperature level. Instead, they either have some numbers or Min-Max settings on them.
It doesn’t matter which one you pick, make sure the iron gets enough hot to melt the Perler beads. The safe range would be from 200°F to 400°F depending on the beads. You can start with the Medium or Cotton setting and then adjust accordingly to get the ideal result.
Make sure the dial is easy to turn and has convenient multiple settings such as the BLACK+DECKER Classic. In case you love basic design and simple functions, then you can try this mini iron from Dyno Merchandise. It’s made for melting Perler beads.
Heating Time
Irons can take 15 seconds to more than 5 minutes to heat up. Pick the one that heats up to the required temp more quickly. There are many models like Steamfast SF-717 that heat up in 15 seconds. It’s pretty quick and ensures even heating to fuse the Perler beads properly.
Weight
An overlooked but important factor. Irons can weigh from less than a pound to more than 4 pounds.
Lighter ones are easy to operate and control. It may take time but you will get the optimal result. On the other hand, heavier irons give the right pressure to the beads and help you get the desired result instantly.
However, it depends on your level of expertise. In case, you’re new, then the lightweight iron like Steamfast SF-717 would be excellent for you.
If you’re experienced, then you can get fine results from heavy models like BLACK+DECKER Classic.
Soleplate Material
If you want the iron to give the finest performance while dealing with beads craft, then take a look at the soleplate material.
The ideal material is Aluminum or Stainless Steel that ensures smooth gliding over the parchment paper as well as long durability.
Also, the plate should be nonstick. In case the one you picked doesn’t have that layer, then make sure it doesn’t stick to the paper.
Frequently Asked Questions
The iron temperature is different for different models. So it’s hard to provide an exact setting that will be ideal for Perler beads. However, we suggest that you set the temperature to Medium or Cotton at first to see if it’s melting the beads properly. Adjust the heat level until you get the desired result. Make sure to use the dry setting.
No. Ironing the Perler beads without parchment paper would just ruin the beads and the design. If you don’t have any parchment paper, then you can cover the beads with a Perler bead peg board, adhesive sheet or wax paper. However, some irons may not work well with all the options. So, you have to experiment.
Mueller Professional Grade MU-77XB comes with all the functionalities that make it a great iron for Perler beads. It heats up within 30 seconds and provides the beads with consistent heating to smoothly fuse the Perler beads together quickly.
Not only that, the iron has other advanced features like self-cleaning system. It works to remove mineral buildup so that it doesn’t ruin your future craft projects. It’s slightly heavy but it gives the right pressure to flatten the beads.
You can certainly get yourself a steam iron if it ensures the right temperature, performance and durability. However, you shouldn’t use is the steam function because that will damage the beads.
Final Words
Once you bring home the best iron for your Perler beads, you will be able to create a variety of crafts with it. Be it a colorful keychain, bracelet, pentomino puzzle, or an artistic card. No matter if you’re building the best waist bead thread or Perler beads, you want to have the best tool for the job!
A reliable iron delivers the right temperature, so it flattens the beads and fuses them together. Since the options we have reviewed here do all of these, choose the right one for your artistic creations.
Other resources: